
I love creating Halloween costumes. Whether they were my own, my husband's or my kids...it's hard for me to just go buy a costume. And even if it is partially store bought, ya gotta add a little DIY detail. I didn't want to be too late in doing this costume post since I'm already seeing so much about Halloween and it's not event October 1st!
Last year my son wanted to be Batman! Here is how we created his blue Batman costume. (The great things is...he still dresses up with all of the pieces of the costume besides the pants and shirt that he outgrew.)
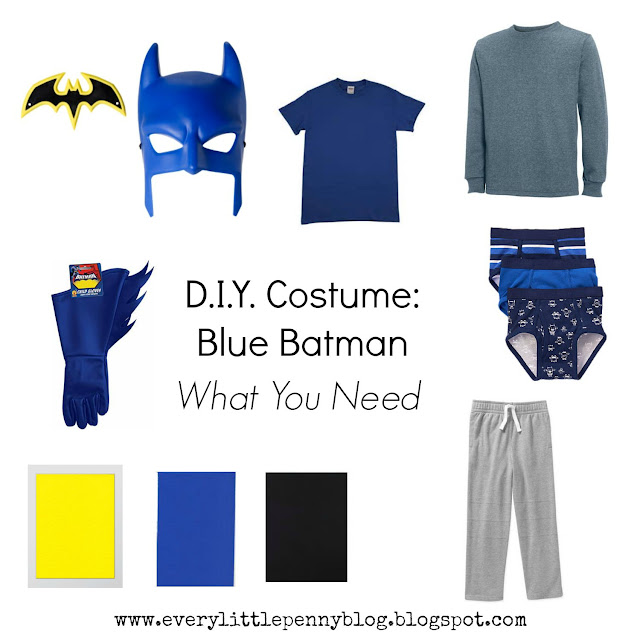
Blue Batman Mask and Batarang
Grey Sweat Pants
Grey Long Sleeve Tee
Royal Blue Adult Tee
Blue Briefs Underwear
We had a pair with a cartoon on the back, so we just put them on inside out.
Blue Super Hero Cuff
We found ours at Michael's but these here awesome!
Yellow Felt
Black Felt
Royal Blue Felt
STEP ONE: CREATE CAPE
You will want to purchase and adult t-shirt for a child's cape in order for the cape to be long enough. I can't remember what size shirt I got for my three year old, just make sure it will be long enough to at least hit somewhere around their knee.
Lay the shirt out flat. Star by cutting the sleeves off at the seams. Now cut up the seam on both sides of the shirt up to the collar of the shirt. DO NOT CUT THROUGH THE COLLAR.
Then cut around the collar on the FRONT of the shirt. You should now have your basic cape.
Now shape up the top of the cape by cutting it inward slightly and cutting out large scallops on the bottom.

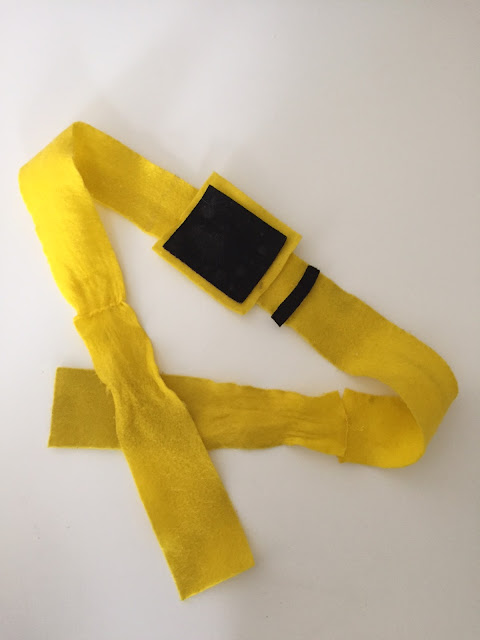
STEP TWO: CREATE BELT
Cut a large square out of the yellow felt. Then cut a slightly smaller square out of the black felt. Glue the black square on top of the yellow square.
For the actual belt I had to cut four long strips of felt to create a belt long enough to tie around the waist. My mother-in-law sewed the four strips together. I'm sure you could also glue the strips with fabric glue but the stitching made it a bit more durable.
Cut two thin strips of black felt the height of the belt. Glue the square and two strips onto your belt.
(As you can see, we lost one of the black strips before this picture was taken.)
STEP THREE: CREATE SHIRT
Print out a Batman logo like this one so you have a template for your logo for the shirt. First cut out around the oval so you can trace and cut out the shape on the yellow felt. Then, cut around the Batman on your template so that you can trace it on your black felt. Once you cut out the Batman you can glue it onto your yellow oval, Now, glue your symbol onto the front of your shirt.

STEP FOUR: CREATE PANTS
OK, I was pretty sloppy with this part. I can't lie. I literally took the square piece of felt, wrapped it around his leg until it laid how I wanted it and then I safety pinned it together. I needed to at least take more time in pinning it to the pants because they fell down a few times. But just make sure to get the felt pinned nicely to the pants and you should be fine.

NOW PUT IT ALL TOGETHER...


So, now I actually have to start on this year's costumes. It looks like it will be Rafael the Ninja Turtle and Tinkerbell.
Are you making any costumes this year? Or even just semi-homemade?
Do your kids have any crazy costume that they want to be?

Last year my son wanted to be Batman! Here is how we created his blue Batman costume. (The great things is...he still dresses up with all of the pieces of the costume besides the pants and shirt that he outgrew.)

Blue Batman Mask and Batarang
Grey Sweat Pants
Grey Long Sleeve Tee
Royal Blue Adult Tee
Blue Briefs Underwear
We had a pair with a cartoon on the back, so we just put them on inside out.
Blue Super Hero Cuff
We found ours at Michael's but these here awesome!
Yellow Felt
Black Felt
Royal Blue Felt
STEP ONE: CREATE CAPE
You will want to purchase and adult t-shirt for a child's cape in order for the cape to be long enough. I can't remember what size shirt I got for my three year old, just make sure it will be long enough to at least hit somewhere around their knee.
Lay the shirt out flat. Star by cutting the sleeves off at the seams. Now cut up the seam on both sides of the shirt up to the collar of the shirt. DO NOT CUT THROUGH THE COLLAR.
Then cut around the collar on the FRONT of the shirt. You should now have your basic cape.
Now shape up the top of the cape by cutting it inward slightly and cutting out large scallops on the bottom.

Cut a large square out of the yellow felt. Then cut a slightly smaller square out of the black felt. Glue the black square on top of the yellow square.
For the actual belt I had to cut four long strips of felt to create a belt long enough to tie around the waist. My mother-in-law sewed the four strips together. I'm sure you could also glue the strips with fabric glue but the stitching made it a bit more durable.
Cut two thin strips of black felt the height of the belt. Glue the square and two strips onto your belt.
(As you can see, we lost one of the black strips before this picture was taken.)

STEP THREE: CREATE SHIRT
Print out a Batman logo like this one so you have a template for your logo for the shirt. First cut out around the oval so you can trace and cut out the shape on the yellow felt. Then, cut around the Batman on your template so that you can trace it on your black felt. Once you cut out the Batman you can glue it onto your yellow oval, Now, glue your symbol onto the front of your shirt.

STEP FOUR: CREATE PANTS
OK, I was pretty sloppy with this part. I can't lie. I literally took the square piece of felt, wrapped it around his leg until it laid how I wanted it and then I safety pinned it together. I needed to at least take more time in pinning it to the pants because they fell down a few times. But just make sure to get the felt pinned nicely to the pants and you should be fine.

NOW PUT IT ALL TOGETHER...


So, now I actually have to start on this year's costumes. It looks like it will be Rafael the Ninja Turtle and Tinkerbell.
Are you making any costumes this year? Or even just semi-homemade?
Do your kids have any crazy costume that they want to be?

Linking Up with:
CUTE AS CAN BE BATMAN! Yep all caps to say way to go mom! I love homemade costumes!! ;-)
ReplyDelete- I love creating Halloween costumes. Whether they were my own, my husband's or my kids... ebatmancostume.blogspot.com
ReplyDelete