Showing posts with label diy. Show all posts

Saturday, October 24, 2015

HomeMade Halloween: Lady Pirate Costume

Ok, this is a pretty simple costume...a pirate ARRRRRR!
But I wanted to share my take on it and I spent less thank $10 putting it together. This was my outfit for the Halloween dinner and I did have fun yelling ARR and saying things like 'me know you have my gold!'


WHAT YOU NEED:
-white blousey top // $3.69 @ Goodwill
-black/red skirt // $3.50 @ Goodwill
-fishnets // $3.74 @ Wal-Mart
- long scarf
-black boots
-pirate accessories (sword, headscarf, earrings, coin bag, etc.)
tip: if you don't already own some pirate accessories from your kids, check the toy section of stores instead of the Halloween section!


The shirt and skirt I found at Goodwill. 
The only thing I did to the shirt was cut the sleeves to make them jagged.
The skirt was actually a cotton sundress. I snipped off the top half of the dress and made the hem of the skirt jagged. It already had the layer of black and red fabric on the bottom. Perfect!

I grabbed the headscarf, pirate sword and coin pouch from my son's room. I purchased the fishnet tights for under $4. I had the earrings which I thought "oh these look like coins and pirates like coins...these will work! The "garter" that I used to hold my coin pouch was actually my daughter's headband.

That's it! This one was really simple. :-)

I urge you to be creative and see what you already have that you can utilize!
If you need a last minute costume, might you go as a pirate??

Linking Up with:

Friday, October 23, 2015

HomeMade Halloween: Colonial Man Costume

My husband and I went to a Halloween dinner this past weekend where we had to follow the theme of pirates and colonial/commodore costumes.
So, I went off on my hunt to make our costumes. My husband's was fun to create and might I add it came out hysterical! (It's all in the wig for me...I just couldn't stop laughing. Loved it! And the face is his "I'm in character mode" face!)

WHAT YOU NEED:
- Blazer (with small collar/lapel) // $11.99 @ Goodwill
-Navy Pants 
-white t-shirt 
-black dress shoes
-white, black and gold felt // .35 each @ Michael's 
-white thigh high socks // $3.74 @ Wal-Mart
- gold buttons // $1.74 @ Wal-Mart
- long (curly) wig // $2.99 @ Goodwill
-red ribbon
-white lace
-toy sword

Let's start with the jacket. I did some digging at the Goodwill and found this blazer in the men's section for $11.99.
I immediately flipped the collar up and knew I could work with this.
I picked up these buttons at Wal-Mart and sewed them the rest of the way up the jacket. I made sure they were evenly spaced using the existing buttons as my guide. Since the buttons I purchased were a slightly darker gold, I took some gold acrylic paint I already had and lightly painted over all of the buttons.

 For the "ruffle shirt", we created a little ruffle piece that we safety pinned to a white t-shirt.
I cut out a piece of white felt into a half oval shape. Then I took stripes of white lace and hot clued it on row by row.

In order to get the ruffle effect, I hot glued the edge on first. Then I folded the lace over every inch or so, glued where it folded over and repeated to the other edge. Once a row was done, I lifted the last row up and started a new row about half way up from the bottom of where that piece of lace would lay. I hope that makes sense!

My husband already had black dress shoes that we altered to look 'colonial style'.
I picked up some black and gold felt from the craft store to make the buckle. I free-handed the black piece but made sure it was wide enough to cover the shoe and high enough to stand up above the shoe. I cut out a gold buckle from the felt and glued it onto the black piece. 
These shoes had a strap across the top already, so I was able to glue a felt loop onto each side of the shoe strap and then glue the buckle onto the loops. This kept the buckles in place without messing up the shoes. 

I cut a strip of black felt, looped it through the pant buckle and stapled it.
This gave a way to carry the sword for the costume hands free.

For the wig, we pulled the hair back into a low pony tail. We had to trim it up a little because it was too long. I then took some red ribbon I had on hand and tied a bow around the ponytail.
For the white stockings, I purchased these white costume socks from Wal-Mart and removed the black bows. We tucked his navy slacks (that he already had) into the whites socks. We pulled the pants over top of the white socks a bit so that you couldn't see the pants tucked into the socks.


There you have it, your colonial man costume!
Are you still working on a costume for this year? Stay tuned, I'll have one other last minute idea for you tomorrow. 
Linking Up with:

Friday, October 16, 2015

{D.I.Y} Purple & Green Halloween Feather Wreath

You know, I've had the decorative pieces for this Halloween wreath for 2 years....TWO YEARS!
I'm super happy I finally completed this thing! I think the hold up was figuring out how to create a black feather wreath (which was what I imagined when I bought these green/purple decorations) that didn't cost an arm and a leg! So the final cost...under $13!! (not including the cost of spray paint)
Let's get to how I did it.


SUPPLIES NEEDED

-18in straw wreath  (purchased at Michael's using a 50% off coupon) $3.25
-black feather boas (purchased 2x 48in ones at Dollar Tree) $2
-black garland (optional, I couldn't find enough $1 boas to cover the wreath so I used this as filler.) $2
-black spray paint
-decorative Halloween pieces (these were decorative picks found at Michael's for 90% off) $4.20
-ribbon (these were decorative picks found at Michael's for 90% off) $.60
-glue gun
-straight pins

STEP ONE

Spray paint your straw wreath black.
Once dry, start wrapping the wreath with the feather boas and garland. (You can do all feathers if you are able to get enough to cover the wreath.) Hot glue the end to the back, wrap and then hot glue your end piece to the back.
I started with the garland and didn't wrap it too closely together. Some of the black straw is showing through. Then I layered on the feather boas, evenly spacing it out as I went.

STEP TWO

Now you can start adding your decorations. With these bigger pieces, I hot glued them in place and then secured them in place with straight pins. The straight pins I used had little black balls on the end.
I put one through the foot of the owl and one into both a green and purple leaf to keep them sitting how I wanted. 

STEP THREE
Now I added my 'ornament' pieces to the wreath. I snipped the wire off the back of the pumpkins and skulls with wire cutters. Then I took straight pins (with no colored ball on the end) and stuck them half way into the back of the pumpkins and skulls. To make sure the pins didn't move when being put into the wreath, I added some hot glue around the straight pin. (see picture below).
Insert your ornamental decorations into the wreath. 

Tip: I did not have regular straight pins to push into these styrofoam decorations. 
So I snipped the needle side of a large safety pin with wire cutters and used that as my straight pin. 

STEP FOUR
Ribbon time! I had some 'Happy Halloween' ribbon that I snipped a piece of and hot glued to the bottom as a little banner. 
Next, I took the green and purple glittery ribbon and cut a long piece of each to tie around the top of the wreath. This is the piece that your wreath will hang from as you can see in the picture below. 
I then cut another long piece of the green and purple ribbon and tied it into a bow. I hot glued the bow to the top middle of the wreath.
The garland that I used to wrap the wreath had those silver skulls that I removed, so as the final touch I glued one to the middle of the bow.

Now hang from a command hook on your front door and get in the Halloween spirit!
Yeah, we're seriously lacking outdoor Halloween decor.

Pretty darn cute, huh? I love sweetly spooky decor and this fits perfectly.
I hope you give making one of these a try! You can take the idea and tweak it depending on the decorative pieces you grab. And remember, you can even just pick up the pieces during the after Halloween sale and make it next year. Or two years from now! ;-)
Linking Up with:

Monday, September 28, 2015

Halloween D.I.Y: Batman Costume

I love creating Halloween costumes. Whether they were my own, my husband's or my kids...it's hard for me to just go buy a costume. And even if it is partially store bought, ya gotta add a little DIY detail. I didn't want to be too late in doing this costume post since I'm already seeing so much about Halloween and it's not event October 1st!

Last year my son wanted to be Batman! Here is how we created his blue Batman costume. (The great things is...he still dresses up with all of the pieces of the costume besides the pants and shirt that he outgrew.)


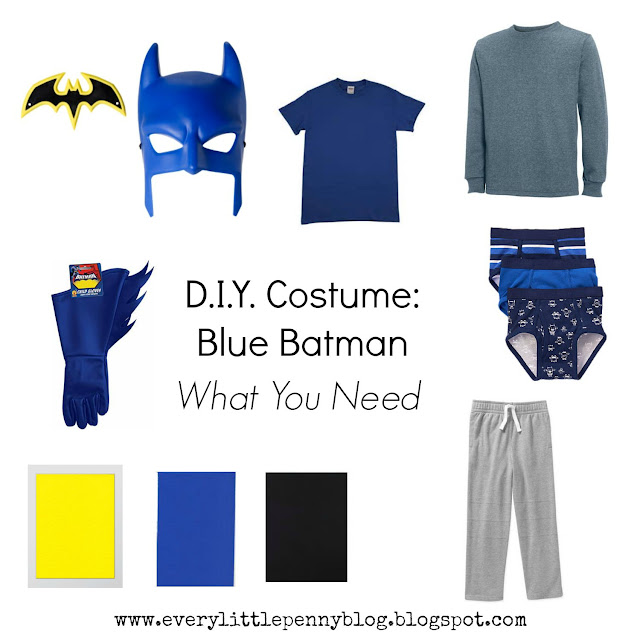
Blue Batman Mask and Batarang
Grey Sweat Pants
Grey Long Sleeve Tee
Royal Blue Adult Tee
Blue Briefs Underwear 
We had a pair with a cartoon on the back, so we just put them on inside out.
Blue Super Hero Cuff
We found ours at Michael's but these here awesome!
Yellow Felt
Black Felt
Royal Blue Felt


STEP ONE: CREATE CAPE

You will want to purchase and adult t-shirt for a child's cape in order for the cape to be long enough. I can't remember what size shirt I got for my three year old, just make sure it will be long enough to at least hit somewhere around their knee.
Lay the shirt out flat. Star by cutting the sleeves off at the seams. Now cut up the seam on both sides of the shirt up to the collar of the shirt. DO NOT CUT THROUGH THE COLLAR.
Then cut around the collar on the FRONT of the shirt. You should now have your basic cape.
Now shape up the top of the cape by cutting it inward slightly and cutting out large scallops on the bottom.


STEP TWO: CREATE BELT

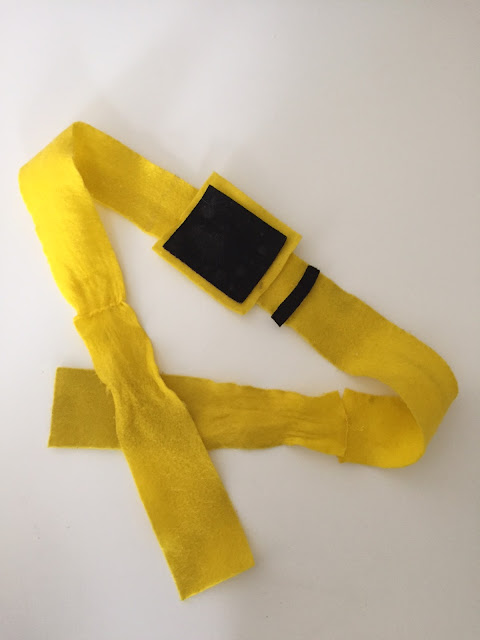
Cut a large square out of the yellow felt. Then cut a slightly smaller square out of the black felt. Glue the black square on top of the yellow square.
For the actual belt I had to cut four long strips of felt to create a belt long enough to tie around the waist. My mother-in-law sewed the four strips together. I'm sure you could also glue the strips with fabric glue but the stitching made it a bit more durable.
Cut two thin strips of black felt the height of the belt. Glue the square and two strips onto your belt.
(As you can see, we lost one of the black strips before this picture was taken.)


STEP THREE: CREATE SHIRT

Print out a Batman logo like this one so you have a template for your logo for the shirt. First cut out around the oval so you can trace and cut out the shape on the yellow felt. Then, cut around the Batman on your template so that you can trace it on your black felt. Once you cut out the Batman you can glue it onto your yellow oval, Now, glue your symbol onto the front of your shirt.

STEP FOUR: CREATE PANTS

OK, I was pretty sloppy with this part. I can't lie. I literally took the square piece of felt, wrapped it around his leg until it laid how I wanted it and then I safety pinned it together. I needed to at least take more time in pinning it to the pants because they fell down a few times. But just make sure to get the felt pinned nicely to the pants and you should be fine.


NOW PUT IT ALL TOGETHER...


So, now I actually have to start on this year's costumes. It looks like it will be Rafael the Ninja Turtle and Tinkerbell.

Are you making any costumes this year? Or even just semi-homemade?
Do your kids have any crazy costume that they want to be?

Peeled Wellness
Linking Up with:

Wednesday, June 24, 2015

Store Bought Cupcakes Turned Bunny Cupcakes

So, here is part two of my bunny party posts. The cupcakes!!

Now look, I love to try and make things from scratch but this past week it was just not going to happen. I ended up ordering a dozen cupcakes from our local grocery store (Publix). I went with vanilla cake, custard filling and a strawberry flavored buttercream icing.


Here's what they looked like when I picked them up. But I wanted to turn them into little bunnies.
I found this great idea and followed it as my guide. (The from scratch coconut cupcakes she made sound awesome if you want to give those a shot! )


What you need:
Bag of sweetened coconut flakes (small bag was just enough for the 12 cupcakes)
Small bag of large marshmallows
Pink sugar sprinkles 
Toothpicks

You can click through the above link for a picture step by step but here is what I did.
  • Sprinkle coconut flakes over the icing. You have to lightly push down to get the flakes to stay. I ended up pouring the coconut flakes into a plastic bowl so they were easier to get to and the coconut that didn't stick could fall back into the bowl.
  • Cut marshmallows in half diagonally.
  • Dip sticky side into pink sugar sprinkles.
  • Insert toothpicks into bottom of marshmallow ear and stick into cupcakes.

And there you have it. Super cute, spruced up store bought bunny cupcakes!
You could always do a white icing (vanilla or cream cheese) but I was stuck on the strawberry icing and was fine with them being slightly pink bunny cupcakes.

In total, the cupcakes with the added decorations cost under $15 for a dozen. 
Side note: I did end up getting the cupcakes for FREE from the grocery store because they couldn't find my order. I had to wait for them to remake the cupcakes and the bakery manager felt bad and sent me home with them at no cost. AWESOME customer service!

Think you'll be making these soon just because they are cute and yummy?! Oh, and totally easy.
Linking Up with:

Monday, June 22, 2015

Bunny Party Table Decor {for under $17}

So the 2nd birthday bunny party is over and turned out great! After the first birthday, I've tried to keep the birthday parties more simple with family only. We like to take the kids to a special place and then theme a small party at home around where we took them. I also like to keep the decor in one area, so typically we keep decorations on and around one table.


This year for my daughter we took her to the local petting farm. I knew there were bunnies at this petting farm, so that is where the idea of the bunny party came from. I was able to pull the decorations off for under $17 because I used a lot of items from around my house, made things from leftover craft supplies and gathered all of the bunnies my mom, mother-in-law and I had around our houses. All items purchased were from Dollar Tree, Michael's and Wal-Mart. 


 Table Decor 
White Plates $1 // Pink Cake Plates $1
(3) Pack green baskets $1 // White Table Cloth $1
Orange Straws $.50

The table runner was made from craft paper I had at the house. I cut a piece about half the length of the table, cut it in half long ways and taped it together to create a runner.
All of the bunnies, plastic cups, bucket for the straws, plants and serving ware I already had.
You can also see in the last picture below that I had one of the bunnies on the left sitting on something. I used an old sage green square fabric box that we had, flipped it upside down and used it as a little shelf for the bunny.

 Balloons
(4) Heart Balloons $4 // (2) Silver balloon weights $2

Carrot Utensils
(2) bags of green silverware $2 // Pack of orange napkins $1
Green curling ribbon - on hand // Basket - on hand

These 'carrot' utensils were simple and such a cute touch. I got the idea from this website although I couldn't find great step by step directions on how they were rolled up. I just played around with it until I got them rolled the way I liked it. The goal was to try and end up with a 'V' design at the front top. Tie with green or even orange ribbon and you are done. 


"Some Bunny is Two"  Sign
Black Posterboard $.97 // White Paint Pen $1.97
Cotton Balls & Construction Paper (on hand)

I printed this bunny template out and used it to trace the bunnies onto pink construction paper.
I looked at some fonts online in order to draw out the 'Some Bunny is 2" letters with the paint pen. Lastly, I took cotton balls and lightly pulled on them to puff them out like a tail and hot glued them on. Beware: if you have animals in your home you might want to hide your sign until it's party time! Either my dog or cat chewed the cotton balls off the night before the party. lol


 Window Detail
Tulle: Leftover from her 1st birthday.
Triangle Banner: made with construction paper and pink ribbon I had on hand. I just created a triangle template, cut out the pieces, put two hole punches in the top and strung the ribbon through them. Once I had them spaced evenly I taped the ribbon to the back of each piece of construction paper.
Tassel Garland: made from some bright green yarn I had on hand from a previous project using these instructions as a guide.


I'm really happy with how this turned out! I definitely learned to save things from previous parties and projects because you can use them again  in a whole new way! It was amazing how much stuff I had that I could use which largely cut down on my decorating cost.
Linking Up with:

Monday, June 8, 2015

1st Birthday Party: Watermelon Picnic Theme

Good Morning! Hope you had a great weekend. Time to kick off another week! 
Since I'm in the middle of putting together a (much smaller) 2nd birthday for my daughter, I thought I'd share some pictures from her 1st birthday. Everything was homemade or purchased at places like Wal-Mart, Dollar Tree, Michael's and Target.
I couldn't decide on a theme but saw a bunch of great ideas with watermelon so I went with a watermelon picnic party theme. (OK and with a splash of tutu fun!) We rented a bounce house with a slide that day but it rained buckets! Some of the kids went in anyway and got soaked but the poor birthday girl missed out.


Warning: Not the best pictures. They were taken in a hurry, bad lighting and I had to crop a bunch of pictures to show specific details.

Watermelon Cakepops
These were made with watermelon cake mix and cream cheese frosting. Dipped in green candy melts and the rind lines were drawn on with this tube icing. Hot pink and green ribbon was then tied in a bow on the sticks.

Tutu Cakepops
My daughter wore a tutu for her birthday party and I just had to make these. They matched the color theme. ;-)  Vanilla cake with cream cheese frosting dipped in hot pink candy melts. Then they were rolled in hot pink sugar and we tied hot pink tulle to the sticks. 

Food Station
Watermelon (duh)
Chips in a basket with a pink towel
Carrots and Celery in small plastic cups with ranch
Goldfish crackers in picnic tablecloth patterned cupcake holders
Cubed Cheese in picnic tablecloth patterned cupcake holders
Peanut Butter and Jelly sandwiches with watermelon toothpicks
Watermelon toothpicks (similar) and cupcake holders (similar/similar) // Michaels


Serving Station
Paper Plates and napkins // Dollar Tree and Wal-mart.
Silverware // Dollar Tree
Silver buckets with white polka dots // Target Dollar Bin

Party Favors
Note says: Thank you for coming to my birthday picnic, hope you had a TUTU-rific time!
Paper Bags // Wal-Mart
Silver Glitter Washi Tape (bottom of the note) // Target Dollar Bin (similar)
Watermelon Clothespins // Michaels 

We included: bubbles, pink heart wands (seen below), and watermelon lollipops (similar) from Michaels.

Drink Station
We served pink lemonade in this drink dispenser we picked up at Ross.
Pink with white polka dot straws // Target

Decor
Lanterns //  Target and Dollar Tree (similar)
Hot Pink Tulle //  Joann Fabrics

 Clusters of hot pink tissue pom pom's //  Made my me
Watermelon Slices //  made by me from construction paper

Smash Cake
We made a homemade cake using Ina Garden's recipe and home made cream cheese icing.
We added strawberry juice to the icing to give it a little pink color.
Hot pink sugar sprinkles around the edge of the cake. This cake was SO DELICIOUS!
Yes, I ate some of my daughters smash cake. lol

We also decorated her high chair with light pink tulle and pink ribbons.

Birthday Accessories
Headband // Dollar Tree (Mother-in-Law added the tulle)
Tutu // Mother-in-Law made by tying on strips tulle and ribbon to a piece of elastic.

So, that's it! A tutu-rific watermelon picnic party!
Like I said, terrible pictures unfortunately but hopefully it can lend a little inspiration if you are party planning anytime in the near future.

Related Posts Plugin for WordPress, Blogger...